Showing posts with label projects. Show all posts

Thursday, June 4, 2009

Small Successes: Spring Gardening Edition

FaithButton

This spring I have had more time and energy to start new gardening projects, not because I am less busy but because my toddler now will let me work and enjoys helping as well.

In March I built four small raised beds. On March 27, the kids each took ownership of one and planted one crop in each square. We have already eaten some of the spinach and it was the sweetest and best I ever tasted! Here are pictures of what they look like today:

Mommy and Two’s Scarlet Nantes Carrots


Twelve’s Straight Eight Cucumbers


Ten’s Calabrese Broccoli


Eight’s Correnta Hybrid Spinach


In May, my eldest daughter turned over a larger vegetable bed for me. We planted several types of seeds in there. So far, we have a few string bean plants that have germinated.


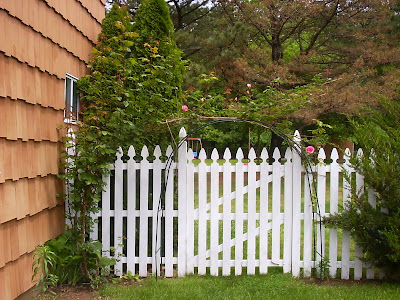
And I finally staked a large rose vine to an arbor over my gate. I used to have this growing up my house, but the staples and thorns were damaging the shingles. When I found this wire arbor at Family Dollar, I took it home and carefully roped the rose vine to both the arbor and the fence. I also gave it a few good feedings. This promises to be a real beauty this year.


Click here for Volume 20 of Faith and Family Live’s “Small Successes”.

Monday, May 18, 2009

The Bunnies’ Vegetable Garden

This weekend I asked my twelve-year-old daughter to help me turn over a vegetable garden. I had planned to add more raised beds to the four small ones we created early in the spring, but decided against the expense of the wood and topsoil. I told her to make a garden with raised rows “like the one Rabbit has in Winnie-the-Pooh”. She got the idea and, without supervision, did this all on her own. In the corner you can see the small burial corner where the bunnies rest. We planted small windmill flower bulbs that will pay a quiet tribute to the gentle creatures. In the garden will be kinds of vegetables they would have loved. Let us hope the wild bunnies don’t come on over to enjoy them too much.

“A time to be born, and a time to die; a time to plant, and a time to uproot the plant.”
Ecclesiastes 3:2

Monday, March 30, 2009

A Garden of Their Own

I have had no luck with growing vegetables since I became a homeowner. Believing the soil in my yard may be at fault, I decided to build some raised garden beds, filled with fresh soil.

I used scrap 2 x 4’s with 3-inch decking screws. I pre-drilled first, and then screwed them in by hand; I have a blister on my thumb to prove it! Since I already had pieces cut, I didn’t need to purchase or cut any lumber. You can make a rectangular bed with only one cut, if you purchase three 2 x 4’s and cut one in half. Most home improvement centers will make free cuts for you.

Beds can be as long as you wish but should not be more than 4 feet wide; most people can easily reach 2 feet from the side to work on their garden. Make sure to measure your lawn mower and make sure there is enough space between the beds for it to get through.

The kids dug dirt from the mulch pile and pulled it in their wagon to the beds, which they filled halfway. We added one cubic yard of organic soil and one cubic yard of regular top soil. The only materials I purchased for this project were the packaged soils and a box of screws, for a total under $10, even including the seeds we would plant.

The kids each have their own square, which is approximately 2 feet by 2 feet. They each receive a packet of seeds that can be planted in early spring in our northeastern region: spinach, cucumbers, carrots, and broccoli. I told them to spread them out evenly in their box and plant them the depth indicated on the packet.

I will be building more larger beds later in the season for all of the seeds that must be planted after the last frost, which for us is in late May. We were anxious to get started with Spring though, and this was a great beginning.

There are nice instructions for this project in the current issue of Better Homes and Gardens. I didn’t copy this idea from them, though, as we had a beautiful raised bed garden that my Dad constructed similarly when I was growing up.

Tuesday, November 25, 2008

Who Needs a Stud?

Are you tired of nagging your husband to put up some shelves in the garage, pantry, or closet? You don’t need a man to do this job for you. Any gal worth her salt can find a stud and get this job done in a jiffy. All you need for your working partners are your level and your stud finder.

Get yourself over to Home Depot and buy the materials to get started. Bring along the measurements of the height, width, and depth of the shelving you desire. Purchase two uprights for each set of shelves. Figure they will be about 18 inches apart to decide how many sets you will need. If you want to store really heavy stuff you will need double uprights. For medium weight stuff, a single standard will do. The standards come in zinc, brown, and white. How deep do you want your shelf? Pick out the brackets to go with your uprights. If you need to buy the actual shelf, those are available in pre-finished, pre-cut boards in white or brown. You would buy a ten-inch wide shelf to go with a ten-inch wide bracket. Make sure all the parts fit together properly.

You will also need a pencil, stud finder, yardstick, level, and screws, 1 ½ to 2 inches long. You can use a drill or Phillips Head screwdriver.

Starting on the left side of the wall, use the stud finder or the old hammer trick to find the first stud. This can be anywhere between 14 and 18 inches from the start of the wall. Make several marks down the line of where the first upright will go. If they all seem to line up, you should have found the correct location of the stud.

Now decide how far from the ceiling you want the upright to start. Remember if you are too close to the ceiling those slots will be useless. I decided on 6 inches for mine. Measure the distance down from the ceiling and draw a small straight line.

Take your upright and line it up with the stud marks. Put a level next to the upright and shift it until the bubble on the level is in between the two center marks. Do not use your eye or the ceiling as your guide. No building is ever completely level.

Drill a screw into the central hole on the upright first. Check to make sure the upright is still vertically level. Then put in the other screws. You will know you are hitting a stud when you feel and hear the screw twisting into hard wood.

Now find the next stud. Again, this can be between 14 and 18 inches from your first stud. Put the level horizontally on top of the first upright and draw a line where the top of the second upright should go. Repeat steps for installing the upright.

Repeat all steps until you have installed all of the uprights.

Now decide how high you want each of the shelves to go. Put the brackets into the slats and give a few downward taps with the hammer to install. On my shelves, I still have room for two rows of shelves on top; I need to purchase 8 more brackets.

Finally, put the shelves on your brackets and you are ready to go! I happen to have enough scrap wood in my shed that I can cut the shelves to fit and save myself some money. After I purchase the remaining brackets, this project will have cost me approximately $30.

Above is a picture of the standards I installed today, complete with the spiders on the ceiling, pencil marks, and a wayward hole from a mistake I made in finding a stud. From start to finish, this took 45 minutes. This is a great starter project because deciding where to make a hole is not the life-or-death decision it would be in your living room.